

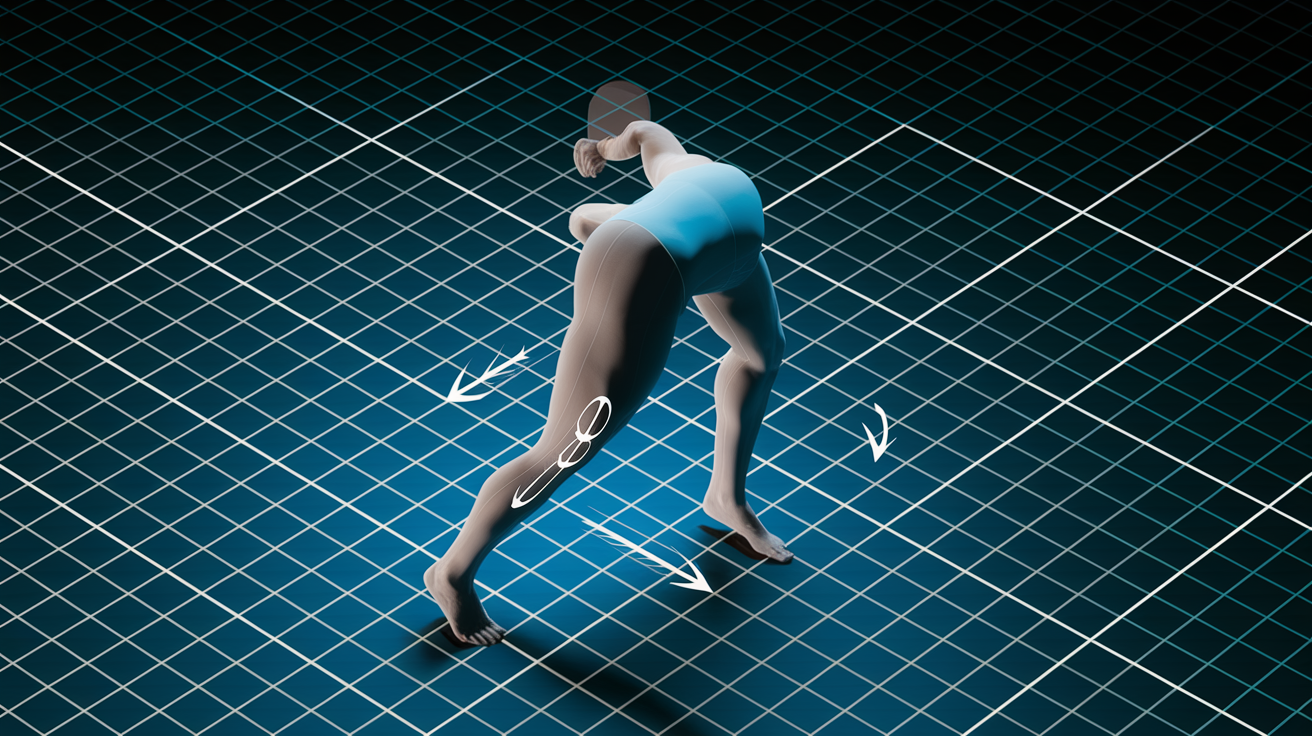
Tight hips—not weak legs—are why most beginners can’t squat deep.
When your hip won’t flex or rotate, your body finds a workaround: you tip forward, knees cave, or you stop short to avoid the pinch.
This short, beginner-friendly routine fixes the problem at the source.
In about 10 minutes you’ll open the front of the hip, ease tight tissues, and add simple glute control so you can actually use the new range.
Do this a few times a week and deeper squats start to feel normal.
Beginner-Friendly Hip Mobility Routine That Immediately Improves Squat Depth

Tight hips are why most beginners can’t squat deep. When your hip won’t flex or rotate like it should, your body finds a workaround. You tip forward. Your knees cave in. You stop short to avoid the pinch. This routine fixes that at the source and builds the control you need to get lower without fighting your own body.
You’re going to mix passive stretching with active control work. That means opening the front of the hip, balancing out the quad and hip flexor tension, and adding some glute strength so you can actually use the space you’re creating. This isn’t just about feeling looser for an hour. It’s about teaching your body what to do with the new range.
Here’s the full 10 minutes:
-
Dynamic warm-up (2 minutes): March in place for 60 seconds, then swing each leg forward and back 10 times to wake everything up.
-
Supine hip flexion stretch (2 minutes): Lie on your back, pull one knee to your chest, hold 30 to 45 seconds per side. Do it twice per leg.
-
90/90 hip rotation drill (2 minutes): Sit on the floor in that 90/90 position and rock side to side. Hold each side for 5 seconds. 8 to 12 reps per side.
-
Couch stretch or half-kneeling hip flexor stretch (2 minutes): Hold 30 to 45 seconds each side. Keep your ribs over your hips. Don’t arch your back to fake it.
-
Glute bridges (1 minute): 10 to 15 reps, slow and controlled. Hold at the top for 2 seconds.
-
Assisted deep squat hold (1 minute): Grab a doorframe or pole, lower into the deepest squat you can handle, and hold 20 to 40 seconds. Rest and repeat once.
The trick is knowing the difference between a good stretch and a pinch. If you feel something sharp or deep in the hip crease, back off a little. Keep your ribcage stacked over your pelvis. Work with what you’ve got. Depth comes when your body trusts the range you’re building.
Hip Mobility Assessment Methods to Identify What Limits Your Squat Depth

Quick tests tell you what’s actually holding you back. You don’t have to guess or copy someone else’s routine. You’ll know if it’s your ankles, your hips, your hip flexors, or all three. This takes less than five minutes and gives you a real starting point.
Five tests to run before you start:
Squat to stand test: Stand with feet hip width apart and squat as low as you can without your heels popping up or your lower back rounding. Notice how low you get and where you feel tight. Front of the hips? Back of the ankles? Both?
Seated hip internal rotation test: Sit on the floor with knees bent at 90 degrees. Let one knee drop inward toward the floor. See if you can get 30 degrees of rotation without your pelvis tilting.
Ankle dorsiflexion knee to wall test: Face a wall, put one foot flat, slide your knee forward until it touches. Measure the distance from your big toe to the wall. You want 10 to 12 centimeters for functional squatting.
Thomas test for hip flexors: Lie on your back at the edge of a bench or bed. Pull one knee to your chest and let the other leg hang. If the hanging leg lifts or the knee won’t bend to 90 degrees, your hip flexors are tight.
Deep squat comfort check: Hold the bottom of a bodyweight squat for 20 seconds. Pay attention to where you feel it. Front of the hip? Impingement or flexor tightness. Back of the ankle? Dorsiflexion limits. Lower back discomfort? You’re compensating for both.
Retest every two to four weeks. Same setup, same conditions. Small improvements in rotation or ankle range show up as deeper, more comfortable squats within the first month if you’re consistent.
Why These Warm-Up Elements Work

A dynamic warm up gets blood moving to your hips, loosens stiff tissues, and primes your body for deeper squatting by gently moving through the ranges you’ll need. Skip it and cold tissues resist everything. Your nervous system keeps things locked down as a reflex. Even five minutes makes a real difference in how much depth you can hit without compensating.
Moving before you stretch gets your joint lubrication going and cuts down on that pinching sensation you get when you squat. Your hip joint makes synovial fluid when you move it. That fluid reduces friction and helps everything glide smoothly. Movement also tells your brain these ranges are safe, which lowers protective tension and lets you get lower with less effort.
| Warm-Up Element | Why It Works |
|---|---|
| Light cardio (3–5 minutes) | Raises your core temperature, gets your heart rate up, delivers oxygen rich blood to the muscles and connective tissues around your hips and legs. |
| Dynamic leg swings (10 reps per side) | Moves your hip through flexion and extension, wakes up the muscles controlling those movements, reduces stiffness in the hip capsule. |
| Hip circles (8–10 per direction) | Explores rotation gently, encourages synovial fluid production, lubricates the joint, reduces friction during deeper squatting. |
| Bodyweight half squats (10 reps) | Rehearses the squat pattern at a manageable depth, activates stabilizers, prepares your nervous system for the deeper ranges you’re working toward. |
Detailed Explanations of Each Drill in the Routine
Each drill targets a specific restriction that shows up when you try to squat deeper. Understanding why each one matters helps you focus on the right sensations and adjust things to match where you’re at right now.
Supine Hip Flexion Stretch
Lying on your back and pulling one knee to your chest isolates hip flexion. Your ankles, knees, and lower back don’t have to get involved. This reduces tightness in the front of the hip and calms that impingement feeling by creating space in the joint. Hold each side 30 to 45 seconds. Keep the opposite leg flat on the floor. If it lifts, your hip flexors are tight and pulling your pelvis forward. You should feel this deep in the hip crease or glute. Not sharp or pinching.
90/90 Hip Rotation Drill
Sitting on the floor with one leg in front and one behind, both bent at 90 degrees, forces your hips to work through internal and external rotation. You need these ranges at the bottom of a squat. Rock gently from one side to the other for 8 to 12 reps. This teaches your hips to rotate smoothly without your lower back or knees taking over. If one side feels way tighter, spend an extra set there. Hold each position for 5 seconds. Imagine your hip socket is a ball joint that needs to roll freely in every direction.
Lizard Lunge Stretch
Step one foot forward into a low lunge and drop your back knee to the floor. This lengthens the hip flexors and adductors on the back leg. It supports upright torso mechanics by reducing the pull of tight hip flexors, which usually force you to tip forward when you squat. Keep your front shin vertical and your hips square to the front. Hold 30 to 45 seconds per side. Breathe into it instead of forcing deeper.
Couch Stretch
Kneel with one shin vertical against a wall or couch and put the other foot flat in front. This improves hip extension, which is your ability to push your hip backward. Poor hip extension makes it harder to keep your torso upright at the bottom because your body compensates by rounding forward. Squeeze the glute of the back leg and keep your ribs stacked over your pelvis. This stops you from arching your lower back to fake the stretch.
Pigeon Pose Variation
A beginner friendly pigeon stretch opens the posterior hip and creates space in the deep glute and rotator muscles that can pull your hip into internal rotation and limit depth. Sit with one shin across your body and fold forward gently. Hold 30 to 45 seconds per side. If this feels too intense, place a folded towel or yoga block under the hip of the bent leg to reduce the angle.
Glute Activation Drills That Support Squat Depth Gains

Glute activation stabilizes your hips during the descent and ascent. It keeps your knees from collapsing inward and keeps your pelvis level. When your glutes are weak or slow to fire, your hip flexors and adductors take over. That limits how much depth you can reach without compensating. Activation drills teach your glutes to engage on demand, especially in the deeper ranges you’re working to access.
Four glute drills that work:
Glute bridges: Lie on your back with knees bent and feet flat. Squeeze your glutes to lift your hips and hold for 2 seconds at the top. 10 to 15 reps.
Banded side steps: Put a resistance band around your thighs just above the knees. Step sideways while keeping tension in the band. 10 to 15 steps each direction.
Clamshells: Lie on your side with knees bent and feet together. Lift the top knee while keeping your feet touching. Hold 2 seconds. 10 to 15 reps per side.
Glute isometrics: Stand on one leg, extend the other leg behind you, squeeze the glute of the standing leg for 10 to 20 seconds. Repeat 2 to 3 times per side.
Go for 10 to 15 reps per drill or 10 to 20 seconds per hold. Complete two sets of each. These fit best at the end of your warm up or right after your mobility work, when your hips are open and ready to practice control in those new ranges.
Beginner Squat Mobility Progressions to Practice Deeper Positions

Once you’ve opened your hips with stretching and activation, you need to practice holding and controlling deeper positions. Your body has to learn to trust the new ranges. Positional practice builds tolerance and strength at end range. That’s where most beginners lose stability and default back to shallow squats.
Start with tempo squats. Lower slowly over 3 to 5 seconds, pause at the bottom for 2 seconds, stand back up with control. This teaches you to feel where your depth limit is and to stop just before your form breaks. Do 3 to 4 sets of 8 reps with bodyweight only. Focus on keeping your heels down and your torso as upright as possible.
Next, use assisted squat holds. Grab a doorframe, pole, or TRX strap and lower into the deepest squat you can reach without pain. Hold 30 to 60 seconds, rest 60 seconds, repeat 2 to 3 times. The assistance lets you relax into the position without worrying about balance. Your hips and ankles get time to adapt. Once you can hold a deep bodyweight squat for 40 seconds unassisted, add a light goblet squat with a dumbbell or kettlebell held at chest height. Use 10 to 20 percent of your bodyweight. Do 3 sets of 8 to 10 reps. Prioritize depth and control over load.
Only increase the load when your form stays stable through the entire range. If your heels lift, your knees collapse, or your lower back rounds, drop the weight and revisit your mobility work. Adding load to a restricted pattern reinforces compensation instead of fixing it.
Mobility Frequency, Set/Rep Guidelines, and Weekly Scheduling
Higher frequency works better for beginners. Your nervous system needs regular reminders that these new ranges are safe and useful. Daily short sessions create faster adaptation than one long session per week, especially when you’re building foundational mobility from scratch.
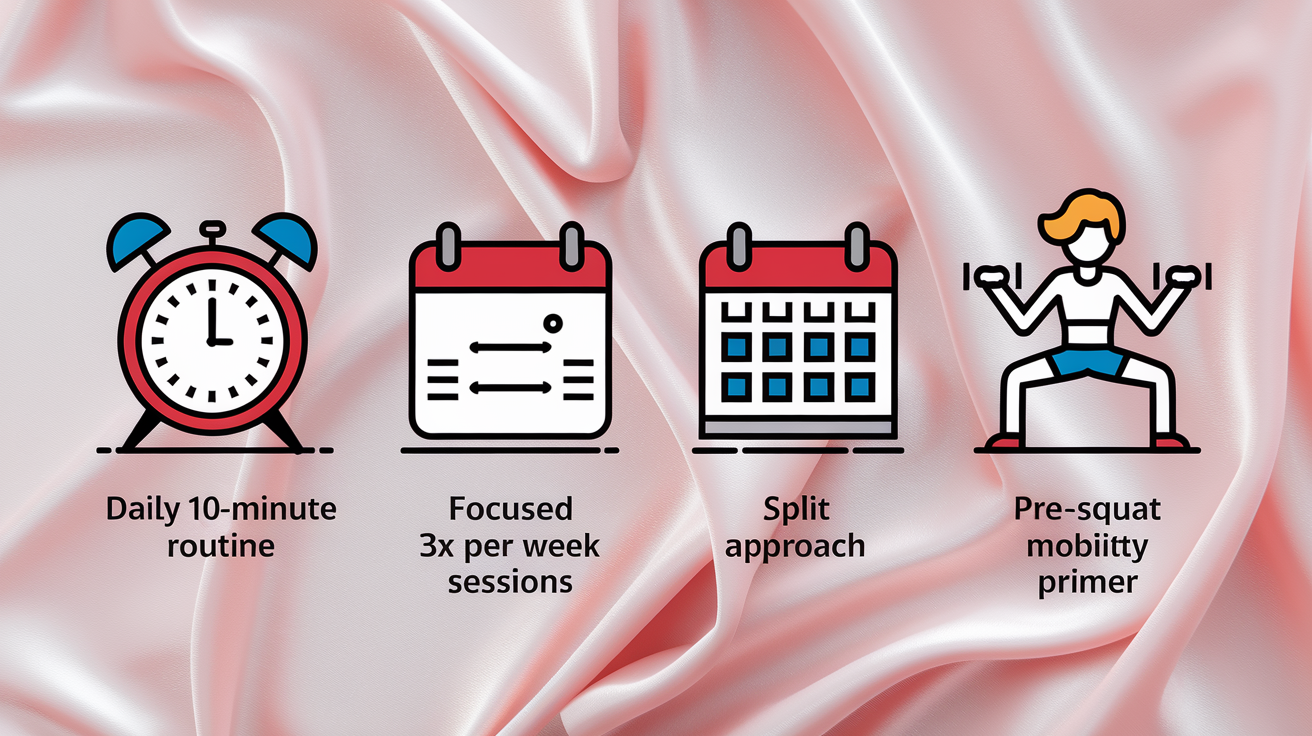
Four scheduling options for busy weeks:
Daily 10 minute routine: Run through the full 6 drill sequence every morning or before bed. One round of each drill with 30 second holds and 8 to 10 reps.
Focused 3x per week sessions (20–25 minutes): Complete 2 to 3 sets of each drill with 45 to 60 second holds and 10 to 12 reps. Pair with your regular training days or schedule standalone mobility sessions.
Split approach (5 minutes daily plus 1 longer session weekly): Do a quick warm up and one or two key drills every day. Dedicate one full session per week to working through the entire routine with extra sets.
Pre squat mobility primer: Run the routine as your warm up before any lower body training session. This primes your hips for deeper squats during your workout and reinforces the ranges you’re building.
Most beginners notice initial improvements within the first two weeks. Small gains in how far your knee tracks forward or how much rotation you can access. Meaningful changes in squat depth, where you’re reaching parallel or below with good form, typically show up between four and eight weeks of consistent practice. Progress stalls when frequency drops or when you skip the activation drills that teach your body to control the new ranges.
Common Mistakes Limiting Hip Mobility and Squat Depth
Forcing depth before your hips are ready increases the risk of pinching, compensatory lower back rounding, and knee discomfort that makes you avoid squatting altogether. When you push past your current range too aggressively, your nervous system tightens up as a protective response. That actually reduces the mobility you’re trying to gain.
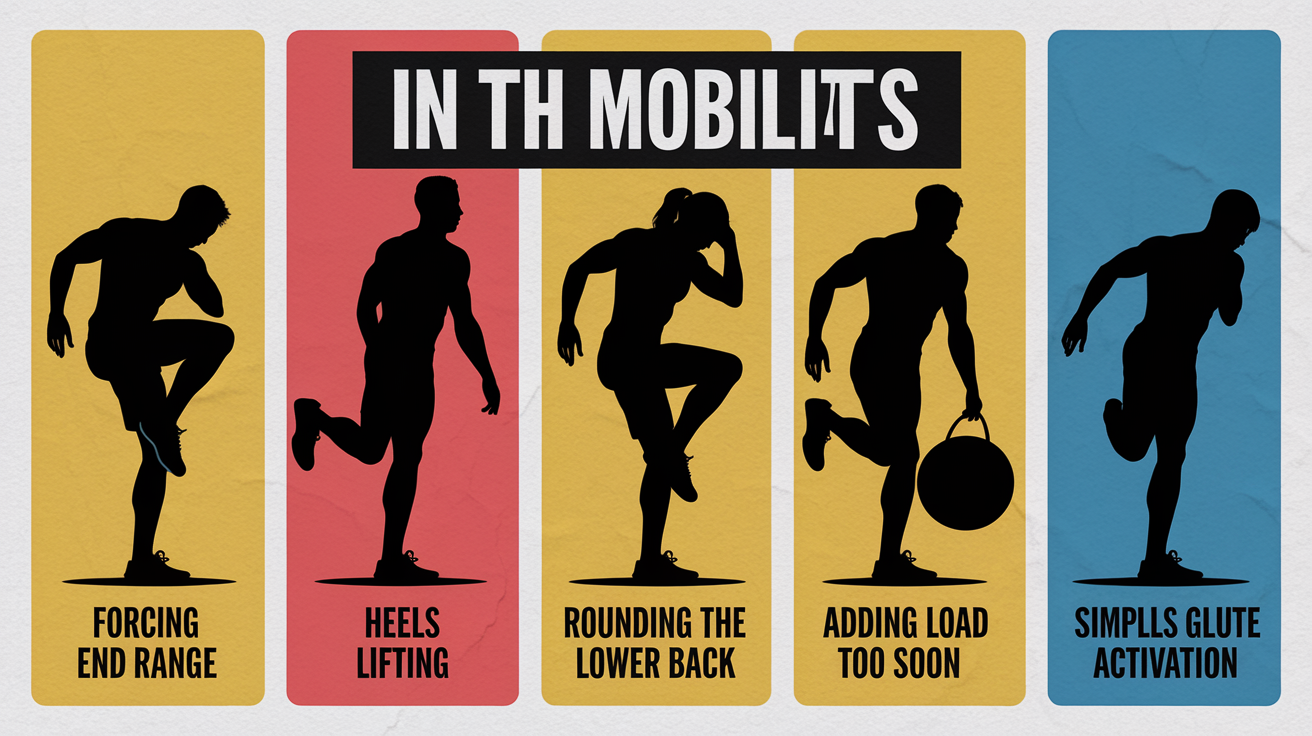
Five common mistakes and how to avoid them:
Forcing end range rotation with pain: If you feel sharp pinching in the front of the hip during stretches, back off slightly and focus on keeping your pelvis neutral. Depth will come as tissues adapt.
Letting heels lift during squats: Heel lift signals inadequate ankle dorsiflexion. Prioritize the knee to wall drill and elevate your heels on small plates temporarily while you build ankle range.
Rounding the lower back to fake depth: If your pelvis tucks under at the bottom, your hips have reached their current limit. Stop there and work on hip flexion and rotation separately before adding depth.
Adding load before controlling the bottom position: Only use weight once you can hold an unassisted deep squat for 30 seconds with stable form. Premature loading reinforces compensation patterns.
Skipping glute activation after stretching: Stretching without activation leaves your hips loose but unstable. Always pair mobility work with at least one glute drill to build control in the new ranges.
Proper mobility selection and smart progression reduce pain, improve control, and build confidence in deeper positions. If a drill consistently causes discomfort beyond normal stretching sensations, skip it and focus on the movements that feel productive.
Tracking Your Hip Mobility Progress for Better Squat Depth

Periodic reassessment keeps you honest about what’s improving and what still needs attention. Without objective tracking, it’s easy to assume you’re making progress when your squat depth hasn’t actually changed. Or you miss small wins that signal your routine is working.
Three simple tracking options:
Side by side photos: Take a video or photo of your squat from the side every two weeks in the same spot with the same setup. Compare depth, heel position, and torso angle over time.
Mobility test numbers: Retest your ankle dorsiflexion distance (knee to wall), hip internal rotation angle, and deep squat hold duration every two to four weeks. Write the numbers down and look for steady improvement.
Squat depth markers: Place a low box, foam roller, or yoga block at a target depth and practice touching it lightly with your glutes each squat session. Lower the marker by an inch or two every few weeks as your range improves.
Progress tracking turns small, incremental improvements into visible proof that your work is paying off. It also helps you adjust your routine. If your ankle range improves but your squat depth stays the same, shift more focus to hip rotation or hip flexor work. Consistent reassessment is what separates a random collection of stretches from a mobility plan that actually changes how you move.
Final Words
Start with the short 10-minute routine: a dynamic warm-up, supine hip flexion, 90/90 rotation, lizard or couch stretch, and glute isometrics. Do the drills with control and simple cues to avoid anterior pinching.
Pair that with quick baseline tests, assisted squat holds, and slow tempo squats. Aim for daily practice or 3×/week and retest every 2–4 weeks. Don’t force depth—back off if it pinches.
This beginner hip mobility routine to improve squat depth is practical and repeatable. Stick with it, and you’ll feel steadier, deeper squats soon.
FAQ
Q: What is a simple 10-minute hip mobility routine for beginners to improve squat depth?
A: A simple 10-minute hip mobility routine for beginners includes a quick dynamic warm-up, supine hip flexion holds, 90/90 rotations, lizard lunge, plus two glute activation drills, with 30–60 second holds and 8–12 reps.
Q: How often should I do hip mobility work to see improvements?
A: Hip mobility work should be done daily or at least three times per week; you can see small changes in two weeks and clearer improvements in four to eight weeks with consistency.
Q: Which simple tests can identify what limits my squat depth?
A: Simple tests that identify squat limits are the squat-to-stand screen, seated hip internal rotation, ankle knee-to-wall dorsiflexion, a hip flexor length test, and a deep-squat comfort check.
Q: What warm-up elements actually help free up hips for squats?
A: Warm-up elements that help hips are 3–5 minutes of light cardio, dynamic leg swings, hip circles, and bodyweight half squats because they boost blood flow, lubrication, and movement control.
Q: How long should I hold stretches and how many reps for activation drills?
A: You should hold passive stretches 30–60 seconds, perform active mobility reps 8–12, and do activation drills for 10–15 reps across 2–3 sets to build usable stability in new ranges.
Q: How can I avoid anterior hip pinching during mobility and squats?
A: To avoid anterior hip pinching, stop if you feel a sharp pinch, focus on active glute control, keep your ribcage stacked over hips, and shorten range or change angle until it feels pain-free.
Q: When is it safe to add load or progress to goblet squats?
A: It’s safe to add load once assisted holds and tempo squats show stable form; use a light goblet squat only when you can keep an upright torso, good knee tracking, and a neutral spine.
Q: What are common mistakes that slow progress in hip mobility?
A: Common mistakes slowing hip mobility are forcing depth, lifting heels, rounding the lower back, adding load too soon, and skipping activation work that stabilizes the hips and knees.
Q: How should I track improvements in hip mobility and squat depth?
A: Track improvements with photos or video, retest mobility numbers like hip internal rotation and knee-to-wall, and use consistent squat depth markers; retest every 2–4 weeks to guide changes.
Q: Do I need equipment to follow this routine?
A: You do not need special equipment; an exercise mat and an optional towel or belt help. The routine uses body position, passive stretches, and isometric glute work to improve depth.
