

What if four weeks of short, simple sessions could make daily movement easier?
This progressive 4-week joint mobility program for beginners is built to reduce stiffness with 8 to 20 minute workouts you can do at home.
Each session moves from seated options to supported standing, and the plan includes a baseline test plus three schedule choices so you can start where you are.
Work most days, follow the gentle progressions, and many people notice less morning stiffness and easier bending, reaching, and walking.
Start small and keep it consistent.
Complete Beginner‑Focused Overview of the Progressive 4‑Week Joint Mobility Program

This 4-week joint mobility program is built for beginners who wake up stiff, struggle with simple things like bending over or reaching up, or just want an easy way back into movement. You get three format options: a 2-week plan with 17+ workouts every other day, a 3-week version with 24+ sessions and a bit less rest, or a full 4-week progression with 31+ sessions. Most workouts take 8 to 20 minutes. If you’re brand new, 5 to 15 minutes can still get you real results.
Every single exercise comes with a seated option and wall or chair support, so balance and standing endurance won’t stop you. You’ll work on every major joint: hips, shoulders, knees, ankles, spine, neck. The movements are gentle and controlled, helping synovial fluid move through stiff joints and rebuilding patterns you might’ve lost from sitting too much. Rest days are already scheduled in, so you’re not grinding through fatigue. And you don’t need any equipment. Start today in your living room without buying anything.
Each session follows the same flow: 2 to 3 minutes to warm up your joints and nervous system, 5 to 12 minutes of targeted mobility work on areas like your hips or shoulders, then 1 to 3 minutes to cool down with breathing and light stretches. It’s short enough to squeeze into a morning routine or lunch break, but complete enough to create noticeable changes in how you move and feel. The whole thing is based on one idea: small, consistent sessions beat sporadic intense workouts when you’re starting from zero or coming back after a long time off.
Baseline Joint Mobility Assessment to Start the 4‑Week Program

Before you start week one, spend 10 minutes checking where your joints are right now. This baseline shows you clear proof of progress later and helps you pick which modifications to use in your first few sessions. You’ll come back to these same tests at the end of week four to see exactly how much easier movement has become.
Test five simple markers that affect your daily life:
Sit-to-stand quality. Sit in a chair and stand up without using your hands. Notice if you lean way forward, if your knees wobble, or if you need momentum to get up.
Shoulder reach test. Reach one hand behind your head and the other behind your lower back. See how close your fingertips get to touching.
Squat depth check. Stand with feet hip-width apart and lower yourself as far as comfort allows. Can you reach parallel thighs, or do your knees or lower back stop you earlier?
Ankle dorsiflexion range. Stand facing a wall and put one foot back. Lean forward until your front knee touches the wall, keeping your heel down. Measure the gap between your toes and the wall.
Spinal rotation. Sit in a chair with arms crossed over your chest. Rotate your torso left and right. Notice how far you can comfortably turn before tightness stops you.
Record each result on a 0-to-10 stiffness scale. Zero means no restriction, 10 means you can barely move. Also write down any tasks that feel tough today, like tying your shoes, reaching a high cabinet, or walking upstairs without grabbing the rail. These real-life markers often improve faster than formal tests and keep you motivated when sessions start feeling repetitive.
Week‑by‑Week Progression in the Beginner Joint Mobility Program
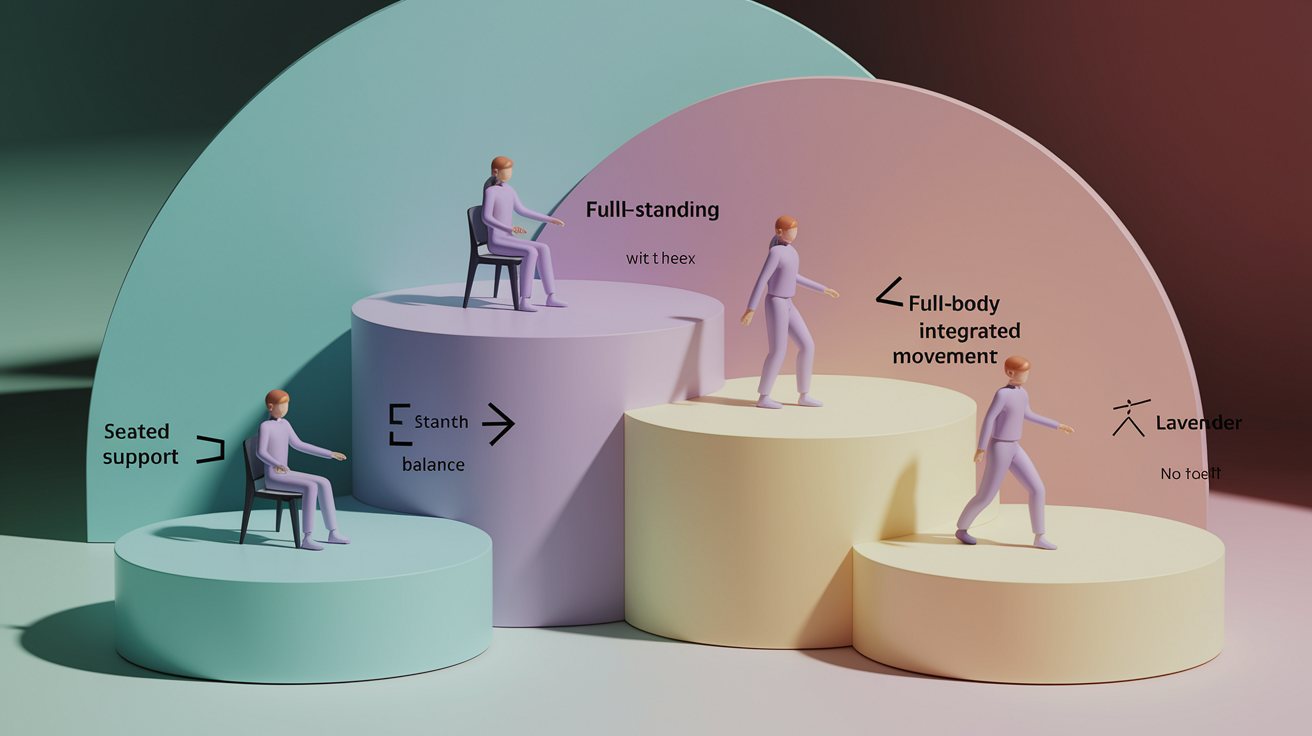
The 4-week structure builds naturally. Each week adds small bumps in session length, movement complexity, and joint demands without overwhelming you or your schedule.
Week 1: Foundational Mobility
Week one is all about learning safe patterns and waking up joints that might not have moved fully in months. You’ll do three sessions every other day, each lasting 5 to 15 minutes. Every drill is seated or uses a wall or chair for support. The main targets are your neck, shoulders, and hips, since stiffness there usually creates the most discomfort when getting out of bed or sitting at a desk.
Sessions focus on slow, controlled reps with posture cues like “ribs stacked over hips” or “chin level.” You’ll move through gentle ranges without forcing anything, and every movement pairs with a breathing pattern to keep your nervous system calm. If you feel sharp pain or pinching, pull back on the range right away. The goal this week? Just show up three times and finish each session feeling looser than when you started.
Week 2: Build Consistency & Add Standing Support
Week two brings in standing variations while keeping wall or chair support available. Sessions stretch to 8 to 12 minutes, and you’ll stick with the every-other-day schedule to protect recovery. This week shifts focus to your lower back, knees, and ankles, building on the hip and shoulder work from week one.
Some drills now ask you to hold positions a few extra seconds or move through a slightly bigger arc. A seated hip circle might become a standing version with one hand on a chair back. Standing recruits more stabilizer muscles around your hips and core, prepping your joints for the strength work in week three. Rest days stay mandatory. Walk or stretch lightly on off days, but don’t repeat full sessions.
Week 3: Strength‑Integrated Mobility
Week three pushes sessions to 10 to 15 minutes and adds light load-bearing drills that mix control and strength. You’ll still rest between sessions, but the movements now include balance challenges or active holds that make your muscles work while your joints move. Think single-leg balance, controlled lunges with a pause, or wall push-ups that involve shoulder blade movement.
This is when most beginners feel a shift from “just moving” to “moving with purpose.” Your body starts remembering how to stabilize joints under gentle load, which shows up directly in tasks like carrying groceries, climbing stairs, or standing from a low chair. If a drill feels too hard, drop back to the seated or supported version from weeks one or two without guilt.
Week 4: Consolidation & Full‑Body Integration
Week four pulls everything together and tests your readiness for longer, more varied sessions. You’ll complete 12- to 20-minute workouts that blend seated and standing sequences, targeting posture, walking mechanics, and the coordination needed for daily tasks like bending and reaching. Some sessions include optional bonus drills or short challenges that preview the next level.
The focus this week is smooth transitions between movements and maintaining good form even as sessions get longer. You’ll revisit the baseline tests from before week one and compare results. Most beginners see measurable gains in squat depth, shoulder reach, and sit-to-stand quality, plus subjective changes like less morning stiffness and easier movement all day. If you’re not ready to move beyond this level, repeat the entire 4 weeks with slightly bigger ranges or longer holds before progressing.
Key Joint‑Specific Mobility Exercises for Beginners

The program includes targeted drills for every major joint system. Each exercise moves from seated to supported standing to unassisted standing as your confidence and control grow. The table below shows example movements for six key areas.
| Joint | Exercise Example |
|---|---|
| Shoulders | Supported pendulum swings (seated or standing), wall slides with scapular engagement |
| Hips | Seated hip circles, supported half-kneeling hip opener with chair assist |
| Knees & Ankles | Seated calf pumps, ankle alphabet, supported mini-squat progressions |
| Spine & Neck | Seated cat/cow, thoracic rotations, chin tucks with wall reference |
| Wrists & Hands | Wrist circles, finger flexion/extension stretches, supported weight shifts onto palms |
| Lower Back | Pelvic tilts (seated or lying), knee-to-chest stretches, supine spinal twist |
Each drill comes with step-by-step HD video demos showing proper form from multiple angles. You’ll see both the full version and the beginner regression, so you can pick what matches your current ability. For example, wall slides might start with your back flat against the wall and arms at shoulder height, then progress over weeks to a full overhead reach with shoulder blades pulled down and back. The videos also cover common mistakes, like letting your ribs flare during hip circles or holding your breath during stretches.
Progressions happen in three stages across the 4 weeks. Week one uses passive or assisted ranges where you move slowly and let gravity or light hand pressure guide the joint. Week two adds active control, meaning your muscles work to move the joint through its range without outside help. Weeks three and four introduce loaded or sustained positions, like holding a hip flexor stretch for 20 seconds or doing a standing ankle drill on one leg. You’ll revisit the same six joint areas each week, so the movements feel familiar even as the challenge ticks up slightly.
The main instruction across all drills? Move within a pain-free range. Mobility work should create a gentle pull or warming sensation, never sharp discomfort or pinching. If a movement hurts, go back to the seated version or reduce the range until the sensation becomes manageable.
Warm‑Up and Cool‑Down Structure for Every Mobility Session

Every session starts with 2 to 3 minutes of gentle, rhythmic movement to raise your heart rate slightly and get synovial fluid circulating through your joints. Examples: marching in place, seated knee lifts, slow arm circles. This warm-up isn’t stretching and isn’t the main mobility work. Its only job is to wake up your nervous system and bring blood flow to the areas you’re about to move.
After the warm-up, you’ll do a few “mobility primers” for the joints you’re targeting that day. If your session focuses on hips, you might do 10 slow hip circles in each direction while seated. If it’s shoulders, you’ll do arm swings or wall slides at a very easy range. These primers give your brain a preview of the ranges you’re about to explore and help you notice any areas that feel especially tight before you begin the main block.
The main mobility block lasts 5 to 12 minutes depending on the week and follows the specific exercise sequence assigned for that session. You’ll move deliberately through each drill, pausing to breathe and reset your posture between exercises. Breathing matters because holding your breath increases muscle tension and limits how far your joints can comfortably move. A simple cue: exhale as you move into the stretch or deepest part of the range, then inhale as you return to the starting position.
After the mobility block, you’ll spend 1 to 3 minutes cooling down with diaphragmatic breathing and light static stretches. The cool-down brings your heart rate back to baseline and signals to your body that the session is done. This is also when you notice how your joints feel compared to the start. Most beginners report feeling “looser” or “lighter” right after finishing, even if stiffness returns later in the day during the first week or two.
Safety, Modifications, and Pain‑Management Guidelines for the 4‑Week Program

This program is built around modifications, not limitations. Every exercise includes a seated version, a wall-supported version, and an unassisted standing version. You pick the regression that matches your current mobility and confidence. If you have arthritis, previous joint injuries, or significant stiffness, start with seated variations and progress only when those feel easy and controlled.
Stop a session immediately if you experience any of these red flags:
Sharp, stabbing pain in or around a joint.
Numbness or tingling that spreads down an arm or leg.
Sudden swelling or warmth in a joint during or after a session.
Dizziness, chest pain, or shortness of breath beyond normal exercise exertion.
A “locking” or “catching” sensation inside a joint that stops smooth movement.
Pain and discomfort aren’t the same thing. Discomfort during mobility work feels like a gentle pull, mild muscle fatigue, or a warming sensation as your joints move through ranges they haven’t used recently. Pain feels sharp, localized, alarming. If you’re unsure whether what you’re feeling is safe, cut the range of motion in half and slow down. If the sensation continues or gets worse, stop the session and talk to a healthcare professional before continuing.
Rest days are built into the program for a reason. Your joints adapt and rebuild during recovery, not during the sessions themselves. Skipping rest days or doubling up sessions won’t speed up your progress and significantly raises your risk of overuse irritation, especially in knees, hips, and shoulders. On rest days, light walking or gentle stretching is fine, but don’t repeat full mobility sessions.
If you’re recovering from a recent injury or surgery, or if you have a diagnosed joint condition like rheumatoid arthritis or osteoporosis, talk with your doctor or physical therapist before starting. They can help you identify which exercises to modify or skip and give you personalized guidance on progression timelines.
Tracking Progress and Measuring Joint Mobility Improvements Over 4 Weeks

Tracking your progress gives you clear proof that the program is working and helps you stay consistent on weeks when motivation dips. Use a simple weekly log to record both objective measurements and subjective improvements in how your body feels during daily tasks.
Follow these five steps to track your progress each week:
Complete the baseline joint tests from the assessment section at the start of week one and again at the end of week four. Measure sit-to-stand quality, shoulder reach, squat depth, ankle dorsiflexion, and spinal rotation.
Rate your morning stiffness on a 0-to-10 scale every Monday morning before your first session of the week. Note whether getting out of bed feels easier, the same, or harder than the previous week.
Log every completed session on a printable checklist or calendar. Mark the date, session length, and any exercises you modified or skipped. Seeing a visual streak of completed workouts builds momentum.
Track one functional task improvement each week. Examples: bending to pick something up from the floor, reaching an overhead cabinet, walking up stairs, or sitting cross-legged. Write a short note about whether the task felt easier, the same, or still challenging.
Measure your perceived stiffness right before and after one session per week. Use the same 0-to-10 scale and note the difference. Most beginners see a 2- to 4-point drop in stiffness right after a session, which gradually becomes a sustained improvement across the full day as the weeks go by.
The program includes downloadable milestone tracking sheets and checklists that walk you through this process. Some formats also offer milestone rewards like exclusive content, discounts on advanced programs, or recognition within the members-only community when you hit key targets like completing all sessions in a week or improving a baseline test by a measurable margin.
Expected improvements over 4 weeks vary by starting point, but most beginners notice easier sit-to-stand transitions, less morning stiffness, and better shoulder or hip range of motion by the end of week two. Functional task improvements like bending, reaching, and walking often show up in week three, while confidence in standing balance and posture typically improves throughout week four. If you don’t see measurable changes by the end of week two, review your session intensity and make sure you’re moving through the full prescribed range rather than rushing through the motions.
Final Words
Start the program with the simple daily template: a 2–3 minute warm-up, a 5–12 minute mobility block, and a 1–3 minute cool-down. It’s short and practical.
Do the baseline tests to see where you are, follow the week-by-week progression, and use seated or wall-supported versions when needed. The plan targets hips, shoulders, knees, ankles, spine, and neck.
Watch for sharp pain, use regressions, and log small wins so you can see real change.
Stick with this progressive 4-week joint mobility program for beginners, and you’ll likely feel steadier, move easier, and have more energy in daily life.
FAQ
Q: What are some good mobility exercises for beginners?
A: Good mobility exercises for beginners are wall slides, seated hip circles, ankle alphabet, supported pendulum shoulder swings, seated cat/cow, thoracic rotations, and chin tucks — all with seated or wall-supported options for safety.
Q: What is the 3-3-3 rule for exercise?
A: The 3-3-3 rule for exercise is a simple 9-minute session: 3 minutes warm-up, 3 minutes targeted mobility work, and 3 minutes cool-down — easy, repeatable, and safe for busy beginners.
Q: What are the only 5 exercises you’ll ever need?
A: The only five exercises you’ll ever need are wall slides, seated hip circles, ankle alphabet, thoracic rotation, and cat/cow — together they improve shoulder, hip, ankle, spine, and core mobility.
Q: What are common mobility training mistakes?
A: Common mobility training mistakes are skipping warm-ups, rushing movements, forcing painful ranges, using only static stretching, and ignoring seated or supported options — all can slow progress or cause pain.
