

What if a bouncy ball could beat sit-ups for building a real, useful core?
Therapy ball exercises force your deep abs, obliques, and lower back to work together.
They also improve balance, posture, and help ease stiff backs without heavy loading.
You’ll learn how to pick the right ball, practice safe beginner moves, and build a simple routine you can do two to three times a week.
Many people notice better control and less stiffness after a few weeks.
If that feels like too much, there are easier options to start with.
Getting Started With the Right Therapy Ball and Beginner Movements
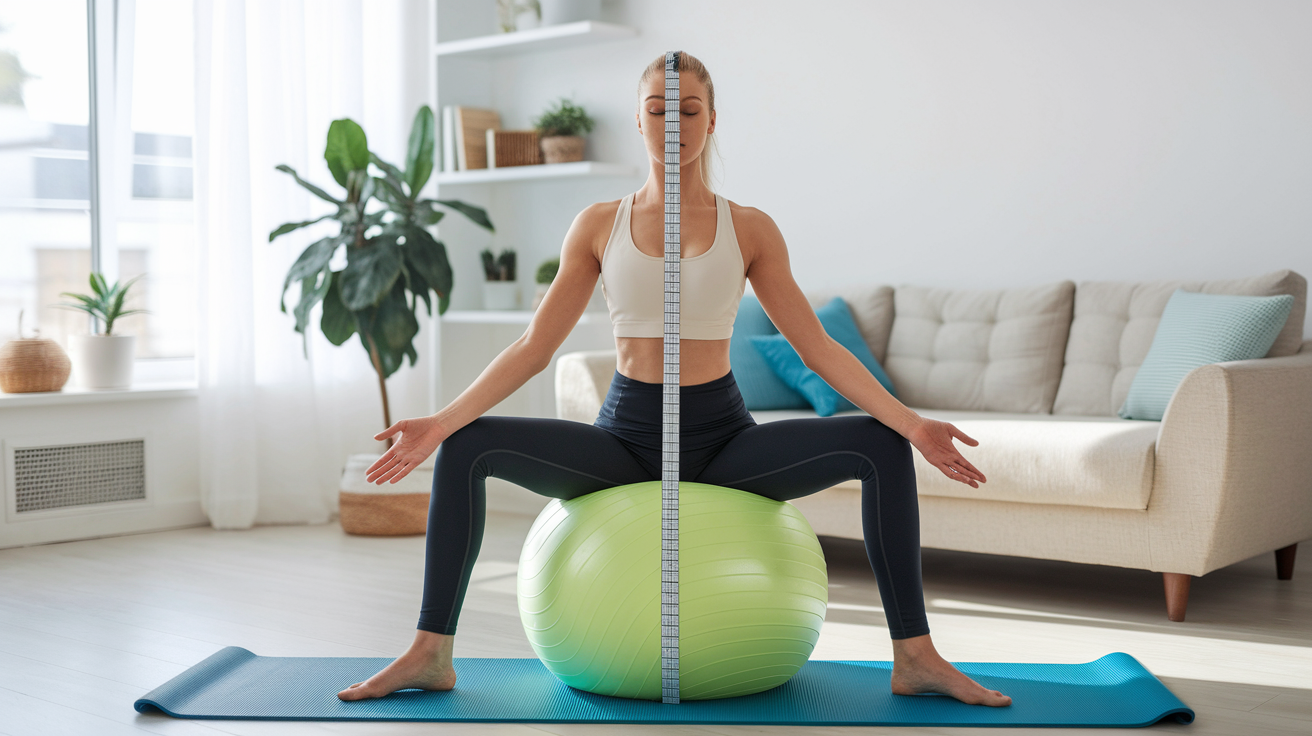
You need to match ball size to your height first. Sit on it and check if your knees hit about 90 degrees. That’s your baseline.
Here’s the breakdown: 45 cm if you’re 4’8″ or under, 55 cm for 4’9″ to 5’3″, 65 cm for 5’4″ to 5’8″, 75 cm for 5’9″ to 6’1″, and 85 cm if you’re 6’2″ or taller. When you inflate it, the ball should feel firm but give a little when you sit down. Too much air makes it unstable and uncomfortable. Not enough makes balancing harder than it needs to be.
Test it by sitting with both feet flat. If your knees drop below your hips, add air. If they’re higher than your hips, let some out.
Start with these five movements:
Seated Balance — Sit with feet hip-width apart and lift one foot an inch off the ground for 10 to 15 seconds. Switch.
Seated Marches — Sit tall, lift one knee toward your chest, lower it, then repeat on the other side. Do 10 to 20 per leg.
Wall Squats With Ball — Put the ball between your lower back and a wall. Feet hip-width apart. Squat until your knees hit about 90 degrees. Do 8 to 12 reps.
Gentle Pelvic Tilts — Sit on the ball, hands on your hips. Tilt your pelvis forward and back slowly for 10 to 15 reps.
Supported Back Extension — Lie face down on the ball, feet against a wall, hands behind your head. Lift your chest a few inches. Do 8 to 10 reps.
Practice two or three times a week on non-consecutive days. Most people feel better balance and control after two to three weeks. If the ball feels too wobbly, use a wall or stabilizer base until you’re more comfortable.
Core Strengthening Exercises Using a Therapy Ball

An unstable surface forces your deep core muscles to activate harder than they would on the floor or a bench. The ball shifts under you during every rep, so your abs, obliques, and lower back work together to keep you steady and aligned.
Five exercises to try:
Ball Crunch — Lie with your mid-back centered on the ball, feet flat, hands lightly behind your head. Lift your shoulders until your shoulder blades clear the ball. Pause and lower slowly.
Ball Plank — Put your forearms on the ball, extend your legs behind you. Hold your body in a straight line from head to heels for 20 to 60 seconds.
Ball Stir-the-Pot — From a forearm plank on the ball, move your forearms in small circles while keeping your hips and spine neutral. Do 5 to 8 circles in each direction.
Supine Ball Pass — Lie on your back holding the ball overhead. Lift your legs and upper body at the same time, pass the ball from your hands to between your feet, lower everything, then pass it back. Repeat for 8 to 12 full passes.
Ball Oblique Rotations — Sit on the ball, lean back a little, lift your feet off the floor. Rotate your torso side to side while holding the ball at chest height. Do 10 to 15 controlled rotations per side.
Start with 8 to 12 reps per movement. Move slowly. Quick, bouncing reps don’t work as well and increase fall risk. Rest 30 to 60 seconds between exercises, and aim for two to three rounds of the circuit. If holding a plank for 20 seconds feels easy, add 10 seconds each week until you hit 60.
Lower-Body Therapy Ball Exercises for Strength and Balance
Therapy ball work can boost muscle activation in your glutes and hamstrings while cutting down joint stress that comes with regular squats and lunges. The instability makes your stabilizer muscles work harder, which improves coordination and helps protect your knees and hips during everyday stuff.
Five lower-body movements:
Hamstring Curl — Lie on your back with your heels on the ball and hips lifted. Bend your knees to roll the ball toward your glutes, then extend your legs back out. Do 8 to 15 reps.
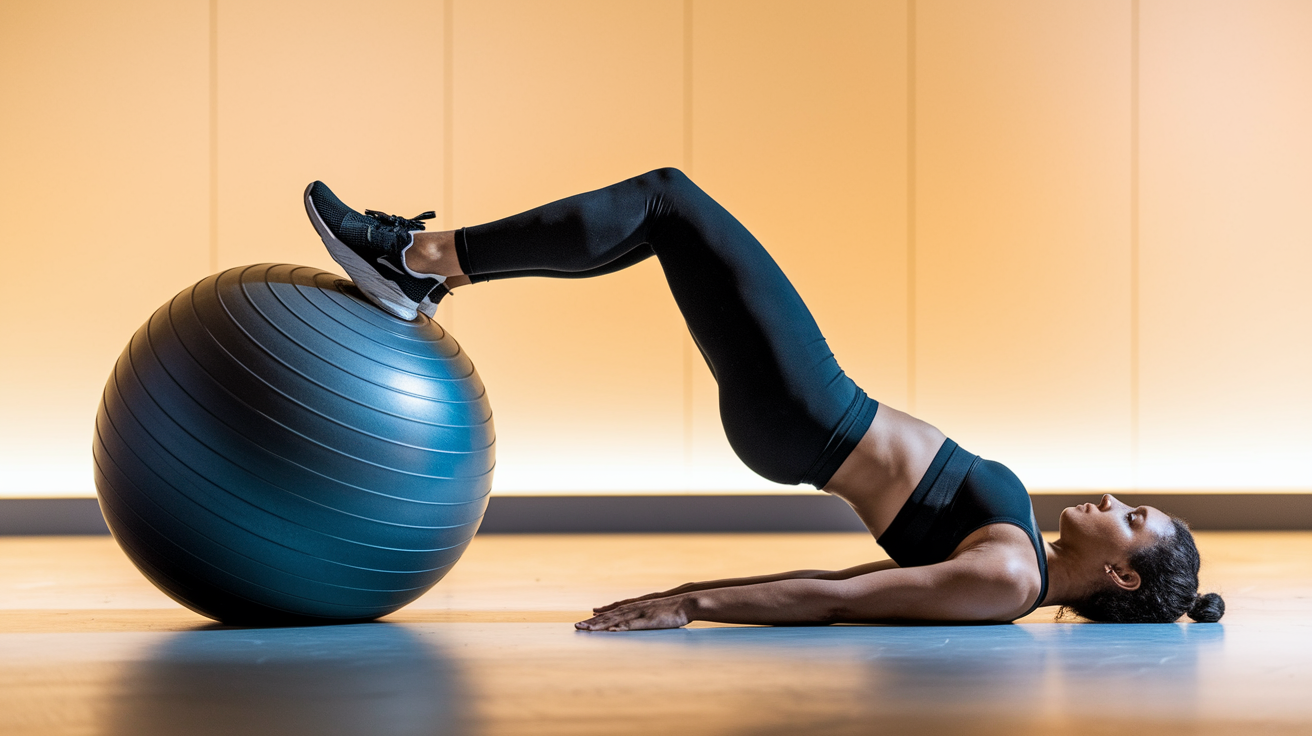
Glute Bridge With Feet on Ball — Lie on your back, heels on the ball. Lift your hips until your body forms a straight line from feet to shoulders. Hold for 2 to 3 seconds at the top, then lower. Repeat for 10 to 15 reps.
Wall Squat With Ball — Put the ball between your lower back and a wall. Squat down until your knees reach about 90 degrees, then push through your heels to stand. Do 8 to 12 reps.
Single-Leg Balance With Ball Support — Stand on one foot and lightly rest one hand on the ball positioned against a wall for balance. Hold for 20 to 30 seconds, then switch legs.
Ball Hip Thrust — Sit on the floor with your upper back resting against the ball. Feet flat, hip-width apart. Drive your hips up until your thighs are parallel to the floor. Lower and repeat for 10 to 15 reps.
If you’re new to ball training, start with the wall squat and glute bridge. They give you the most support and let you build strength before moving to hamstring curls or single-leg balance drills. Add two to three reps each week, and consider a second set once you can do 15 reps with good form. Keep your core engaged and don’t let your knees collapse inward during squats and bridges.
Upper-Body Therapy Ball Exercises for Strength and Posture

Doing upper-body movements on a therapy ball activates stabilizing muscles in your shoulders, upper back, and core that usually stay quiet during regular bench or floor exercises. The constant micro-adjustments you need to stay balanced improve posture and help fix rounded shoulders from desk work or phone use.
Five upper-body exercises:
Ball Push-Up — Put your hands on the ball, extend your legs behind you. Keep your body in a straight line. Lower your chest toward the ball, then push back up. Start with 8 to 12 reps. If this feels too hard, do push-ups on the floor until you build enough strength.
Ball Chest Fly With Dumbbells — Lie with your upper back on the ball, feet flat, hips lifted. Hold a light dumbbell in each hand with arms extended above your chest. Lower the weights out to the sides in a wide arc, then bring them back together. Do 8 to 12 reps.
Ball Back Extension — Lie face down on the ball with your feet anchored. Hands behind your head. Lift your chest a few inches off the ball, squeezing your shoulder blades together. Lower slowly. Repeat for 8 to 12 reps.
Ball Shoulder Raises — Sit on the ball holding light dumbbells at your sides. Lift both arms out to the sides until they reach shoulder height, pause, and lower. Do 10 to 12 reps.
Ball Triceps Extension — Sit on the ball and hold one light dumbbell with both hands overhead. Bend your elbows to lower the weight behind your head, then extend your arms back up. Do 10 to 12 reps.
Keep your core tight and spine neutral throughout every movement. Don’t arch your lower back or let your hips sag during push-ups and back extensions. If you feel your form breaking down, reduce reps or switch to an easier variation until your strength catches up. Adding small weights is fine, but focus on control over heavy loads. Sloppy form on an unstable surface increases injury risk without adding real benefit.
Full-Body Routines Incorporating the Therapy Ball

Building a total-body circuit with therapy ball exercises improves coordination, burns more energy than isolated movements, and keeps your workouts efficient. Sequencing matters. Start with lower-body or core movements when you’re fresh, then move to upper-body work as fatigue builds. This order protects your spine and cuts down the chance of losing balance during harder exercises.
Four sample circuits organized by experience level:
Beginner Circuit — Wall squat with ball (10 reps), seated marches (20 total), ball crunch (10 reps), ball push-up on knees (8 reps). Rest 60 to 90 seconds, repeat twice.
Intermediate Circuit — Glute bridge with feet on ball (12 reps), ball plank (30 seconds), hamstring curl (10 reps), ball back extension (10 reps). Rest 60 seconds, repeat three times.
Advanced Circuit — Ball hip thrust (15 reps), ball stir-the-pot (8 circles each direction), supine ball pass (12 reps), ball push-up (12 reps), single-leg balance with ball support (30 seconds per leg). Rest 45 seconds, repeat three to four times.
Mobility-Focused Circuit — Gentle pelvic tilts (15 reps), ball oblique rotations (12 per side), supported back extension (10 reps), wall squat with ball (10 reps). Rest as needed, repeat twice.
Rest times should match your fitness level and goals. Beginners do better with 60 to 90 seconds between rounds to let heart rate settle. Intermediate and advanced users can drop rest to 45 to 60 seconds if conditioning is a priority. If you’re using therapy ball circuits for rehab or active recovery, take as much rest as you need to keep form clean on every rep.
Rehabilitation-Focused Therapy Ball Movements

Therapy balls show up a lot in physical therapy because they allow controlled, low-impact movement that rebuilds strength and coordination without overloading healing tissues. The gentle instability encourages muscle activation at lower intensities, which makes these exercises good for people recovering from back pain, joint injuries, or surgery.
Four rehab-appropriate movements:
Lumbar Pelvic Tilts on Ball — Sit on the ball with feet flat and hands resting on your thighs. Slowly tilt your pelvis forward to arch your lower back slightly, then tilt backward to flatten it. Move gently through 10 to 15 reps without forcing the range.
Wall-Supported Roll-Downs — Stand with the ball between your mid-back and a wall. Slowly bend your knees and roll the ball down the wall, then return to standing. Do 8 to 10 reps, keeping movements smooth and controlled.
Seated Posture Alignment Drill — Sit tall on the ball with feet hip-width apart. Focus on stacking your ribs over your pelvis and gently drawing your shoulder blades down and back. Hold for 20 to 30 seconds, relax, and repeat three to four times.
Controlled Arm Lifts — Sit on the ball and slowly lift one arm forward to shoulder height, hold for 2 to 3 seconds, then lower. Alternate arms for 10 to 12 reps per side.
Stop right away if you feel sharp pain, numbness, or tingling. Mild muscle fatigue is normal. But joint pain or nerve symptoms mean you’ve pushed too far. Reduce range of motion, cut reps, or switch to a simpler variation. Always check with a physical therapist or doctor before starting ball exercises if you’re managing an injury or chronic condition. Rehab work should feel challenging but never painful.
Safety Guidelines for Therapy Ball Workouts
Most therapy ball injuries happen because of slippery surfaces, overinflated balls, or poor setup rather than the exercises themselves. A stable environment and proper ball maintenance reduce fall risk and let you focus on movement quality instead of worrying about losing balance.
Use a non-slip surface like a yoga mat or carpeted floor. Hardwood, tile, and polished concrete get slick when combined with socks or sweaty feet. If you’re working on a smooth floor, take off your socks and use bare feet or grippy training shoes.
Five safety rules:
Check foot placement — Keep feet flat and hip-width apart during seated or standing exercises. Narrow stances reduce your base of support and make falls more likely.
Use wall support for beginners — Position the ball against a wall for your first few sessions. This gives you a stable reference point and stops the ball from rolling away unexpectedly.
Test inflation before every workout — Sit on the ball and check that your knees form a 90-degree angle. A ball that’s too firm or too soft changes exercise difficulty and increases injury risk.
Move with controlled tempo — Don’t bounce or jerk through reps. Slow, deliberate movements keep you stable and improve muscle engagement.
Avoid socks on smooth floors — Bare feet or non-slip shoes give you better traction. Socks reduce grip and make it easy to slide off the ball during push-ups, planks, or bridges.
Check your therapy ball regularly for wear, scratches, or weak spots. Replace any ball that shows signs of damage. Store it away from direct sunlight and sharp objects to make it last longer.
Common Mistakes to Avoid With Therapy Ball Exercises

Small errors can turn good therapy ball movements into frustrating or risky ones. Most mistakes come from rushing, ignoring setup details, or copying exercises without understanding proper alignment. Fixing these improves results and keeps your workouts safe and sustainable.
Watch for these five:
Choosing the wrong size ball — Using a ball that’s too large or too small throws off your starting position and makes exercises harder to control. Measure your seated knee angle and adjust ball size or inflation until you hit 90 degrees.
Arching your lower back — Letting your lower back sag during planks, push-ups, or bridges shifts stress onto your spine instead of your core. Keep your ribs stacked over your pelvis and engage your abs throughout every rep.
Rushing through reps — Fast, bouncy movements reduce muscle engagement and bump up the chance of slipping or losing balance. Aim for 2 to 3 seconds on the way down and 2 to 3 seconds on the way up.
Gripping the ball too tightly — White-knuckling the ball during push-ups or planks creates unnecessary tension in your hands, wrists, and forearms. Use a firm but relaxed grip that lets you adjust hand position as needed.
Inconsistent breathing — Holding your breath during challenging exercises spikes blood pressure and reduces endurance. Exhale during the hardest part of the movement (the push or lift) and inhale during the easier phase (the lower or return).
If you catch yourself making one of these mistakes, pause the set, reset your position, and try again. It’s better to do fewer reps with clean form than rush through a full set with sloppy alignment. Progress comes from quality reps, not high volume with poor technique.
How to Progress Therapy Ball Exercises for Different Fitness Levels

You can make therapy ball exercises harder by changing your body angle, reducing contact points, adding external load, or increasing movement complexity. These adjustments keep exercises challenging as your strength and balance improve, without needing new equipment or a complete program overhaul.
Four progression methods:
Body Angle Changes — Move from easier angles to harder ones. Start ball push-ups with your hands on the ball and feet on the floor, then switch to feet on the ball and hands on the floor. Decline positions increase load and demand more core stability.
Reduced Contact Points — Cut down the number of limbs touching the ground or the ball. Try a single-leg glute bridge instead of both feet on the ball, or lift one foot during a ball plank. Fewer contact points force stabilizer muscles to work harder.
Added Weights — Hold light dumbbells during ball exercises like shoulder raises, chest flies, or back extensions. Start with 2 to 5 pounds and bump up by 2 to 3 pounds every two to three weeks as strength builds.
Unstable Sequencing — Combine two movements into one exercise. Do a ball squat followed right away by an overhead press, or add a ball pass between reps of a supine crunch. Linking movements challenges coordination and increases time under tension.
Increase difficulty every two to three weeks if you can finish your target reps with good form and minimal rest. Add 2 to 3 reps, bump hold times by 10 seconds, or move to the next progression method. If a new variation feels too hard, step back to the previous level for another week or two. Consistent, gradual progress beats aggressive jumps that lead to frustration or injury.
Final Words
Start by choosing the right ball size and inflating it to the proper firmness, then try the five beginner moves to build balance and confidence.
Next, layer in core work, lower- and upper-body drills, full-body circuits, and gentle rehab options while sticking to the safety cues to avoid common mistakes.
Progress slowly by changing position, contact points, or adding light load. Keep coming back, and therapy ball exercises are simple, adaptable, and a steady way to feel stronger and more mobile.
FAQ
Q: What exercises can I do with a therapy ball?
A: You can do seated balance, seated marches, wall squats with the ball, gentle pelvic tilts, supported back extensions, plus core moves like ball crunches and planks to build stability and strength.
Q: Do core exercises help with scoliosis?
A: Core exercises can help with scoliosis by improving spinal stability, posture, and muscle balance; guided, tailored routines from a clinician reduce pain risk and should match your curve and symptoms.
Q: What exercise is best for high blood pressure?
A: Aerobic exercise, like brisk walking, cycling, or swimming, is best for high blood pressure; aim for 30 minutes most days and check with your provider before starting.
Q: What is the 3-3-3 rule for exercise?
A: The 3-3-3 rule for exercise commonly means three exercises, three sets each, three times per week, a simple beginner-friendly structure to build consistency and manageable volume.
